The following are the available flows in the NetSuite Accounting template that can be installed in your integrator.io account from Integration Marketplace:
- NetSuite Order to Cash Sale
- NetSuite Order to Customer Deposit
- NetSuite Order to Invoice
Understanding key terms
- Cash Sales
A cash sale is a transaction where payment is settled immediately. Generally, you should create a cash sale only if you receive assured payment at the time of the sale. This could be in the form of credit card, check or cash. - Customer Deposits
A customer deposit transaction records the funds received when a customer makes an advance payment for an order. This payment is recorded in the general ledger as a liability until the goods or services are actually delivered and does not affect the customer's accounts receivable balance. After the order is fulfilled, the deposit is applied against the invoice and the liability is canceled out. - Invoices
An invoice is a record of a sale to a customer. Invoicing is the process of creating bills for goods and services that customers receive. Record an invoice when payment is not received at the time of delivery. The invoice amount is the total due to be paid to you by the customer. When you provide terms for your customers and let them pay within a certain period of the delivery of the product or service, you should issue an invoice so you can keep track of who owes you and how much. NetSuite keeps track of your outstanding invoices in an account called Accounts Receivable.
Overview
-
NetSuite Order to Cash Sale
A pre-built integration that can be easily installed into any integrator.io account and can be used to bill sales orders as cash sales in NetSuite.
-
NetSuite Order to Customer Deposit
A pre-built integration that can be easily installed into any integrator.io account and can be used to create customer deposits from sales order records.
-
NetSuite Order to Invoice
A pre-built integration that can be easily installed into any integrator.io account and can be used to bill sales orders as invoices in NetSuite.
Key Benefits
Creating manual invoices takes time. It leads to delays in the payment process and is error-prone. By automating your payment process, you can:
- Reduce operating expenses by reducing time spent on account receivables and handling more payments with fewer staff
- Scale operations to easily handle growth and peak volume periods
- Repurpose accounting staff to high-value activities
- Improve customer satisfaction with timely, error-free payment processing
Installing the template
To access step by step procedure on how to install the template, see How to install a template in integrator.io.
Post-installation Configuration
Once you successfully install the template on your integrator.io account, you are redirected to the Settings page of the installed template. This is the page from where you can access the integration flow associated with your template.
Now, you are required to perform the following steps:
Step 1: Create a saved search in NetSuite
For the integration flow to pull sales order information from NetSuite:
- Create a saved search in NetSuite
- Select the record type as Sales Order
- Based on the type of template, add the criteria as displayed in the following image:
NetSuite Order to Cash Sale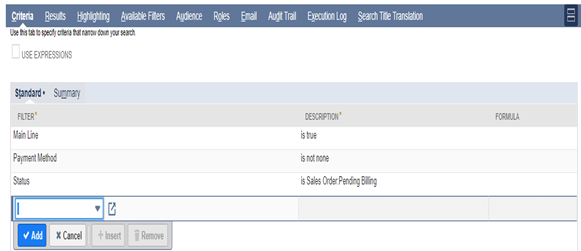
NetSuite Order to Customer Deposit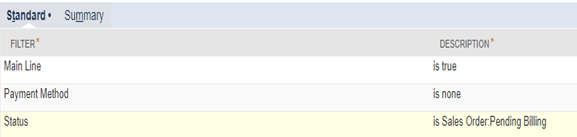
NetSuite Order to Invoice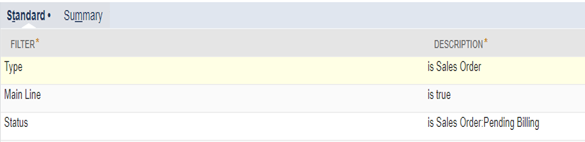
Step 2: Create a custom field in the Sales Order record in NetSuite
Create a custom field of type checkbox in NetSuite. This field is used for identifying a sales order that has already been transformed into cash sale/ customer deposit/ invoice. This checkbox is marked as checked once the integration flow transforms a sales order into cash sale.
Step 3: Setup the integration flow in the template
On the Settings page, use the following steps to complete the post-installation setup and prepare your integration flow associated with the template for transforming sales order:
- Click on the integration flow name. The Edit Flow page is displayed.
- Look for the What would you like to export? Section and make the following changes in associated settings:
- Saved Search Type: Select Public.
- Saved Search: Click the Refresh List icon and from the drop-down list, select the saved search you have created in step 1.
- Export Type: From the drop-down list, select Once.
- Boolean Field: Click the Refresh List icon and from the drop-down list, select the custom field in the sales order record from NetSuite that you have created in step 2.
- Click Next. The import settings are displayed.
- Click Next (No change required in the import section). The map settings are displayed.
- Click Launch Field Mapper to view and update mappings.
- Click Next. The done settings are displayed.
- Look for the Schedule Section and assign a value to the Frequency drop-down list.
- Click Save.
You are redirected to the Settings page of the template. Enable the flow by clicking on the Off/On button to start using this template.