You must keep your Magento 2 products in sync with NetSuite items so that any updates made to the products are automatically reflected in Magento 2. This lets you reduce errors related to product specifications across different product types.
Before you start
Before you can sync your items, there are some concepts to understand and actions to take.
Understand definitions and concepts
The following links and terminologies will help you understand the concepts that are necessary.
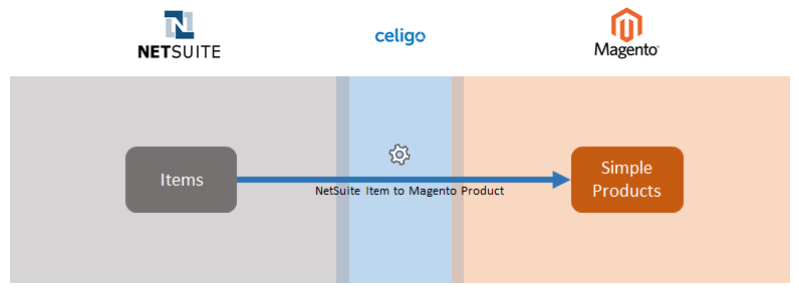
- NetSuite Items are also called Simple Products in Magento.
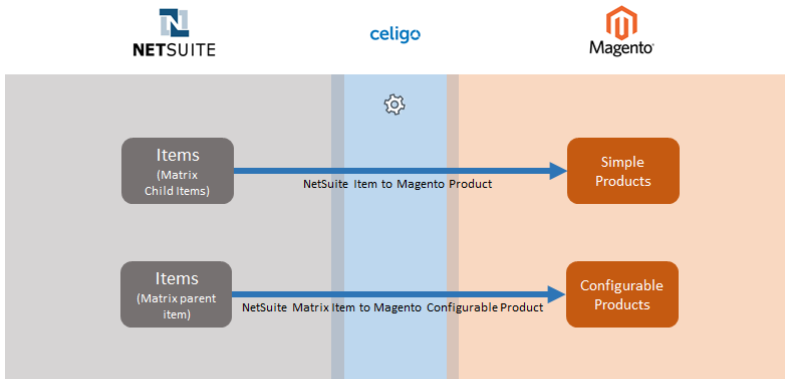
- NetSuite Matrix Items are also called Configurable Product in Magento.
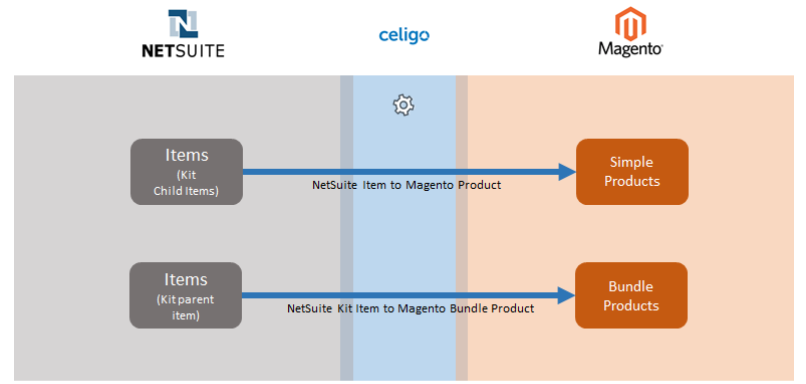
- NetSuite Kit Items are also called Bundle Product in Magento.
- Customer Group, Website, Store, Store View, Attribute Set, Category.
- Virtual variation
Run these flows
You should run the following flow to setup your Integration App for item sync.
- Magento Customer Group to NetSuite: Run this flow to sync your Magento customer groups to "Celigo Magento 2 Customer Group" in NetSuite.
- Magento Website to NetSuite: Run this flow to sync your Magento Websites to "Celigo Magento 2 Website" in NetSuite.
- Magento Store to NetSuite: Run this flow to sync your Magento stores to "Celigo Magento 2 Store" in NetSuite.
- Magento Store View to NetSuite: Run this flow to sync your Magento store views to "Celigo Magento 2 Store View" in NetSuite.
- Magento Attribute Set to NetSuite: Run this flow to sync your Magento attribute sets to "Celigo Magento 2 Product Attribute Set" in NetSuite.
- Magento Category to NetSuite: Configure category sync and run this flow to sync your Magento categories to "Celigo Magento 2 Product Category" in NetSuite.
Configure Magento category sync
- In integrator.io, click the Magento 2 - NetSuite Integration App tile.
- On the left, go to Settings > Integration Flows > General > Advanced Settings.
- From Add Magento 2 Categories in NetSuite as, select the desired value.
Info: Let’s you select the way Magento category information is displayed in the Magento 2 categories field under eTail > Magento of an item record in NetSuite. For example, if your Magento account contains the category as "Men’s -> Shoes -> Sport Shoes", the following is how it will be displayed in NetSuite based on the value you select.
|
Value selected in "Add Magento 2 Categories in NetSuite as" |
Display in NetSuite |
|
Level 1: Level 2: Level n |
Men’s: Shoes: Sport Shoes |
|
Level n: Level 2: Level 1 |
Sport Shoes: Shoes: Men’s |
|
Level n (Level1: Level n-1) |
Sport Shoes (Men’s: Shoes) |
Note: If you change and save the drop-down value, you will have to run the "Magento Category to NetSuite" flow again. This will change the display of category information in NetSuite accordingly.
- (optional) Select Exclude default category from category name in NetSuite.
Info: Lets you exclude the Default Category when you import categories from Magento 2 to NetSuite. For example, if this check box is selected, "Men's -> Shoes -> Sport Shoes" will be displayed as "Men's: Shoes: Sport Shoes" in NetSuite. Otherwise, it will be displayed as "Default Category: Mens: Shoes: Sport Shoes". - Click Save.
Map tier pricing
You can map NetSuite price levels to Magento customer groups of a Magento Website. Or, you can map NetSuite price levels to a Magento Website. The Magento tier pricing should be mapped appropriately in the Integration App so that no errors or duplicate products get created during product syncs.
- In integrator.io, click the Magento 2 - NetSuite tile.
- Go to Settings > Integration flows > Product > Advanced Settings > Map Magento Website/Customer Groups with NetSuite Price Levels.
- Below the column names, click each Refresh icon. This will fetch values present in NetSuite and Magento.
- Select either or both of the following.
- Under the "Magento 2 Website" column, select the desired Magento Website.
- Under the "Magento 2 Customer Groups" column, select the desired Magento customer group.
- Under the "NetSuite Price Levels" column, select the desired price level for the values selected in step 2.
- Under the "Default Price Level" column, select Yes if you want to set the price specified in NetSuite price level for syncing product price as the default price. This would sync the default price if no price is found for the mapped tier pricing.
- Click Save.
Make sure your Magento product attributes are also in NetSuite
You must ensure that the product attributes present in Magento are also present in NetSuite. Generally, additional attributes are added as custom fields in the item record.
To ensure the required attributes are present in NetSuite, you must check the flow's field mapping and the Results tab of the NetSuite saved search.
For example, if you add a new attribute "color" in Magento, in NetSuite perform the following steps:
- In the NetSuite Search bar, search for the required saved search and click on it.
Info:
- If you are syncing simple products search for Celigo Magento 2 Item Export Search [your Magento instance].
- If you are syncing bundle products search for Celigo Magento 2 Kit Item Export Search [your Magento instance].
- If you are syncing simple products search for Celigo Magento 2 Matrix Item Export Search [your Magento instance].
- Click Edit this search.
- Click the Results tab.
- Under the "Field" column, in the text box, enter "color". If the attribute is already present it will appear as a suggestion. Note: If the attribute does not appear as a suggestion, you must create a custom item field in NetSuite.
- Add a value under the "Custom label" column for "color".
- Click Add.
- Click Save.
- In integrator.io, click the Magento 2 - NetSuite Integration App tile.
- Go to Settings > Integrations Flows > Product.
- Click the Field Mappings icon of the required flow.
- If you are syncing simple products click the "Field Mappings" icon of the "NetSuite Item to Magento Product" flow.
- If you are syncing configurable products click the "Field Mappings" icon of the "NetSuite Matrix Item to MagentoConfigurable Product" flow.
- If you are syncing simple products click the "Field Mappings" icon of the "NetSuite kit Item to Magento Bundle Product" flow.
- Under the "Export Field" column, select "color" and map it to the Magento attribute "product.color" under the "Import Field" column.
- Click Save & Close.
Configure NetSuite items
The Magento 2 - NetSuite Integration App identifies NetSuite items for sync only if it is configured for Magento.
To configure NetSuite items for Magento:
- Sign in to your NetSuite account.
- Go to Lists > Web Site > Items.
- Click the item that you want to configure for Magento.
- Click Edit.
- Click eTail.
- From Etail channel select "Magento 2".
- (optional) Select Is virtual variation if you have configured virtual variation.
- (optional) Select Is virtual parent if you want to mark this item as virtual variation parent.
- Go to eTail > Magento2.
- In Magento 2 Website, select the Magento Website to which this item belongs.
- From Magento 2 attribute set, select the attribute set that belongs to this item.
- In Magento 2 categories, select the category to which this item belongs.
- In Magento 2 instance, select your Magento 2 instance to which this item belongs.
- (optional) For kit and matrix items, you can select Dynamic SKU if you want the kit/matrix item's price to be calculated based on its child items. Note: If you provide pricing details in the item, these details will take precedence over dynamic pricing even if it is selected.
- (optional) For kit/matrix items, you can select Price view.
- Click Save.
Configure currency
You should configure the currency in which your NetSuite item price should be synced as products' price in Magento.
To configure the currency:
- In integrator.io, click the Magento 2 - NetSuite tile.
- Go to Settings > Integration flows > Product > Advanced settings.
- From NetSuite currency for syncing product price, select the desired currency. For example, you can select "USA".
- Click Save.
Other settings
- Import attributes values for all store views:
Sync your simple product
The "NetSuite Item to Magento Product" flow lets you sync your simple products from NetSuite to Magento. When you run this flow, the simple product present in NetSuite is synced to Magento and the Magento ID is saved in the "Celigo Magento 2 Item Id Map List" record in NetSuite. This record can be found using the global search bar in NetSuite.
Configure and run the flow
Notes:
- You should schedule the flow to run at regular intervals to sync items that are added after the first execution of the flow.
- For syncing existing NetSuite items, you will have to manually edit and save them. Or, if you want to sync all the existing items, run the "NetSuite Kit Item to Magento Bundle Product" flow. This flow updates the "Celigo Magento 2 Item Id Map" record for existing items. You can then run the "NetSuite Item to Magento Product" flow again to sync all your existing items as products in Magento.
- In integrator.io, click the Magento 2 - NetSuite tile.
- Go to Settings > Integration flows > Product.
- Turn on the NetSuite Item to Magento Product flow.
- From NetSuite saved search for syncing item details, select the configured saved search. By default, Celigo Magento 2 Item Export Search [your Magento instance] is already selected.
- Click Save.
- Click the Run button corresponding to the NetSuite Item to Magento Product flow.
Define your criteria to sync simple product
To customize the saved search:
- In NetSuite, in the global search bar, enter Celigo Magento 2 Item Export Search [your Magento instance].
- Press Enter.
- In the results that are displayed, find Celigo Magento 2 Item Export Search [your Magento instance].
- Click Edit this Search.
- Under the "Criteria" tab, add the desired criteria.
- Click Save.
Sync your configurable product
The "NetSuite Matrix Item to Magento Configurable Product" flow lets you sync your configurable products from NetSuite to Magento. To sync your configurable products, you first have to sync all the NetSuite child items to Magento using the "NetSuite Item to Magento Product" flow. After the child item sync is successful, you can sync the parent item as a configurable product to Magento using the "NetSuite Matrix Item to Magento Configurable Product" flow. The Magento ID of the synced products is saved in the "Celigo Magento 2 Item Id Map List" record in NetSuite. This record can be found using the global search bar in NetSuite.
Configure and run the flow
Notes:
- You will have to schedule to flow to run at regular intervals to sync items that added after the first execution of the flow.
- For syncing existing NetSuite items, you will have to manually edit and save them.
- In integrator.io, click the Magento 2 - NetSuite tile.
- Go to Settings > Integration flows > Product.
- Turn on the NetSuite Item to Magento Product flow.
- From NetSuite saved search for syncing item details, select the configured saved search. Generally, you will select Celigo Magento 2 Item Export Search [your Magento instance].
- From NetSuite saved search for syncing matrix item details, select the configured saved search. Generally, you will select Celigo Magento 2 Matrix Item Export Search [your Magento instance]
- Click Save.
- Click the Run button corresponding to the NetSuite Item to Magento Product flow.
- After successful execution of the above flow, click the Run button corresponding to the NetSuite Matrix Item to Magento Product flow.
Define your criteria to sync configurable product
To customize the saved search:
- In NetSuite, in the global search bar, enter Celigo Magento 2 Matrix Item Export Search [your Magento instance].
- Press Enter.
- In the results that are displayed, find Celigo Magento 2 Matrix Item Export Search [your Magento instance].
- Click Edit this Search.
- Under the "Criteria" tab, add the desired criteria.
- Click Save.
Sync your bundle product
The "NetSuite Kit Item to Magento Bundle Product" flow lets you sync your bundle products from NetSuite to Magento. To sync your bundle products, you first have to sync all the NetSuite child items to Magento using the "NetSuite Item to Magento Product" flow. After the child item sync is successful, you can sync the parent item as a bundle product to Magento using the "NetSuite Kit Item to Magento Kit Product" flow. The Magento ID of the synced products is saved in the "Celigo Magento 2 Item Id Map List" record in NetSuite. This record can be found using the global search bar in NetSuite.
Configure and run the flow
Notes:
- You will have to schedule to flow to run at regular intervals to sync items that added after the first execution of the flow.
- For syncing existing NetSuite items, you will have to manually edit and save them.
To configure and run the flow:
- In integrator.io, click the Magento 2 - NetSuite tile.
- Go to Settings > Integration flows > Product.
- Turn on the NetSuite Item to Magento Product flow.
- From NetSuite saved search for syncing item details, select the configured saved search. Generally, you will select Celigo Magento 2 Item Export Search [your Magento instance].
- From NetSuite saved search for syncing kit item details, select the configured saved search. Generally, you will select Celigo Magento 2 Kit Item Export Search [your Magento instance]
- Click Save.
- Click the Run button corresponding to the NetSuite Item to Magento Product flow.
- After successful execution of the above flow, click the Run button corresponding to the NetSuite Kit Item to Magento Product flow.
Define your criteria to sync bundle product
To customize the saved search:
- In NetSuite, in the global search bar, enter Celigo Magento 2 Kit Item Export Search [your Magento instance].
- Press Enter.
- In the results that are displayed, find Celigo Magento 2 Kit Item Export Search [your Magento instance].
- Click Edit this Search.
- Under the "Criteria" tab, add the desired criteria.
- Click Save.