The integration app allows you to sync Square order as a NetSuite cash sale.
Understand how the flows work
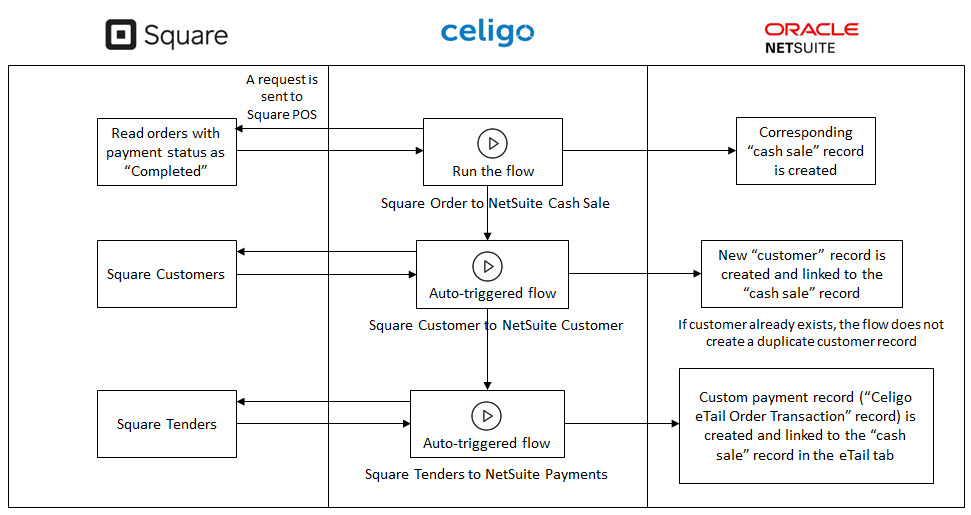
The Order section consists of the following three integration flows:
Square Order to NetSuite Cash Sale
This flow imports order and its associated customer and tender (payment) information from Square to NetSuite, only for the selected locations. This is a scheduled flow and syncs all the orders that are created and updated from the last flow runtime. The flow reads the orders only with payment status as “Completed.” For these orders (each POS transaction), a corresponding “Cash Sale” record is created in NetSuite.
- Note: The flow also allows you to sync Square historical orders to NetSuite.
Square Customer to NetSuite Customer
This flow syncs the customer information associated with an order as a new NetSuite customer record. This sequenced flow is triggered internally during the order flow. The customer record is linked to the cash sale record.
If a customer record with the same name, email ID, or customer ID already exists in NetSuite, the flow does not create duplicate customer records and uses the existing matching records. The creation of duplicate records depends on the Customer Lookup Criteria setting. You can modify the criteria accordingly.
- Note: The flow doesn’t perform update operation on the Customer record.
Square Tenders to NetSuite Custom Payments
This flow syncs the tender related information to NetSuite, only if you enable the flow. This flow creates a custom payment record “Celigo eTail Order Transaction” for every Square tender. The custom payment is linked to the cash sale record. This flow is triggered internally during the order flow.
You can charge a transaction through multiple payment methods.

The first payment method value is added to the NetSuite native payment method field. For each payment transaction, a corresponding custom payment record is created in NetSuite and linked to the “Cash Sale” record.
Before you enable the flows - configure general settings
Before you sync your orders for the first time, configure the below settings in the “General” tab in your Integration App:
- The Square Account Name setting displays a name that is connected via this integration. The Integration App assigns a default business name (as per your Square account) on your first install. You can update this field with an appropriate account name up to max 20 characters. On update, the account name changes are reflected in the flows and saved searches in NetSuite.
- The Select active Square locations setting displays the locations added to your Square account. You must ensure to select one or more active Square locations to sync data between Square and NetSuite. The flow picks orders and refunds only for the selected locations.
- Note: If you do not select any location in this setting, you cannot enable the integration flows.
Configure and run the flow
Step 1: Configure basic settings
- In integrator.io, click Square - NetSuite Integration App tile.
- Go to Settings > Integration flows > Orders.
- Enable the “Square Order to NetSuite Cash Sale” flow.
- The “Square Customer to NetSuite Customer” and “Square Tenders to NetSuite Custom Payments” are auto-triggered flows after you run the order flow.
Step 2: Configure advanced settings
- Go to the Advanced Settings section and configure the settings appropriately. For more details, refer to understand the order advanced settings.
- After you configure the advanced settings, click Save.
Step 3: Map your fields and run the flow
- For “Square Order to NetSuite Cash Sale” flow
- Next to the flow, click Edit Mappings.
- From the “Import Field (NetSuite)” drop-down list, select Location (InternalId).
- Next to the newly added entry, click Settings.
- On the Settings window, in the “Field Mapping Type” field, select Hard-Coded.
- Note: If multi-location scenarios, instead of hard-coding the location value, you can use custom mappings.
- From the “Value” drop-down list, select the appropriate location.
- Click Save. After you save, the entry is displayed as follows:
Export Field (HTTP) Import Field (NetSuite) <Location number> Location (InternalId) - Note: You can also add the location mapping at the line-level instead of the above-mentioned.
- For “Square Customer to NetSuite Customer” flow
- Next to the flow, click Edit Mappings.
- From the “Import Field (NetSuite)” drop-down list, select Subsidiary (InternalId).
- Next to the newly added entry, click Settings.
- On the Settings window, in the “Field Mapping Type” field, select Hard-Coded.
- From the “Value” drop-down list, select the appropriate subsidiary.
- Click Save. After you save, the entry is displayed as follows:
Export Field (HTTP) Import Field (NetSuite) <Subsidiary number> Subsidiary (InternalId)
- On the mappings window, click Save & Close.
- Run the “Square Order to NetSuite Cash Sale” flow.
To import a Square order, refer here.
Find your records in NetSuite
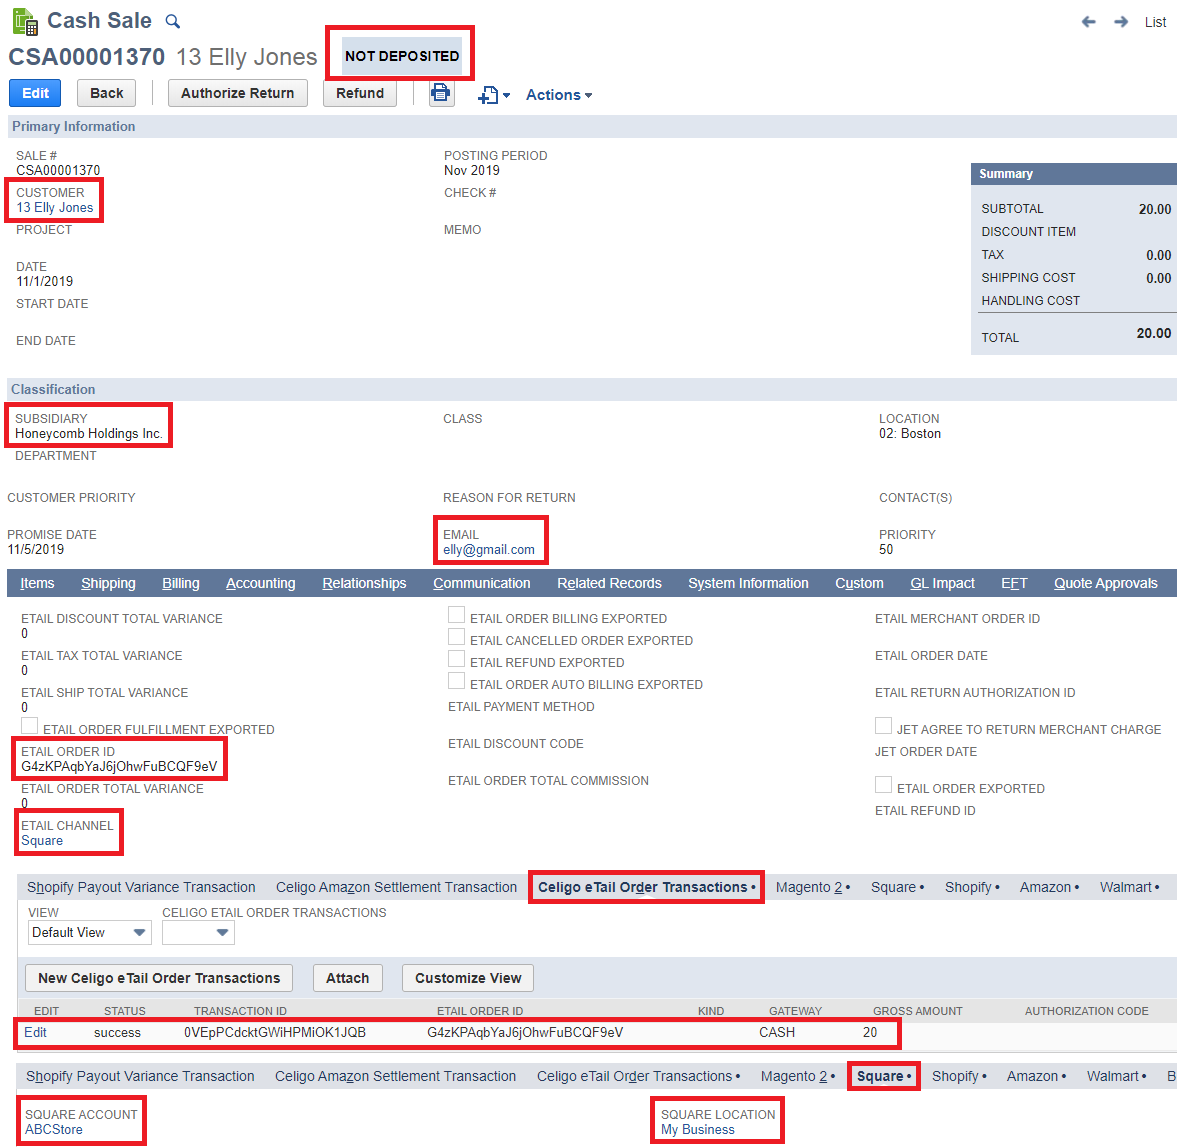
Cash Sale record
After you run the “Square Order to NetSuite Cash Sale” flow:
- A cash sale record is created in NetSuite.
- Cash Sales are applied to the Undeposited Funds account.
- The customer and payment record is linked to the cash sale.
- Square account and Square location are displayed in the eTail > Square tab.
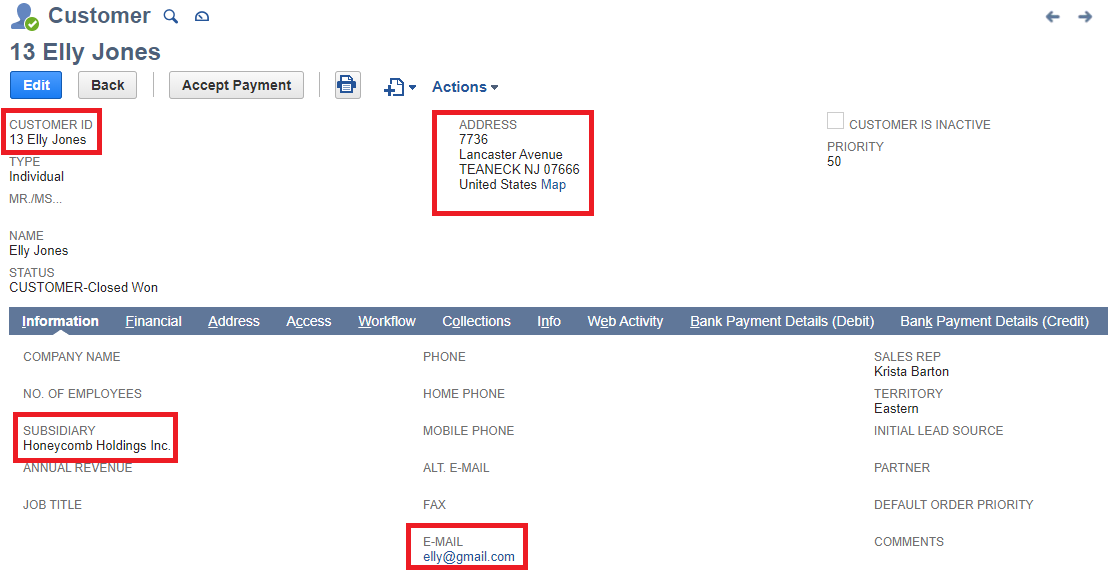
Customer record
If you enable the “Square Customer to NetSuite Customer” flow, a new customer record is created in NetSuite, only if the record does not exist.
In this record you can find:
- Customer ID
- Address
- Subsidiary to which the customer is linked.
Celigo eTail order transaction record
If you enable the “Square Tenders to NetSuite Custom Payments” flow, a custom payment record “Celigo eTail Order Transaction” is created in the eTail > Celigo eTail Order Transaction tab.
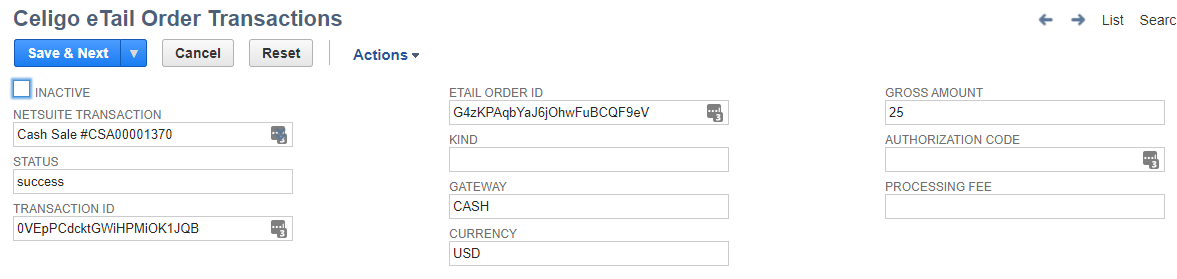
The custom payment record contains the listed tender attributes such as id, created_at, note, Amount_money, processing_fee_money, type, payment_id. As there is NS limitation to have only one payment method on the transaction, default the payment method to the first value coming from Square.
Check out our community forum to ask questions and get insightful tips on Square orders from our community members.